Showing posts with label our home. Show all posts

Friday, January 20, 2012

Impulse Buy

If you follow me on Facebook, you know that last weekend we stumbled upon our local Restoration Hardware going out of business. While I'm not a fan of the dark, depressing look they've got going on in their stores these days, I still really like their bedding and furnishings.

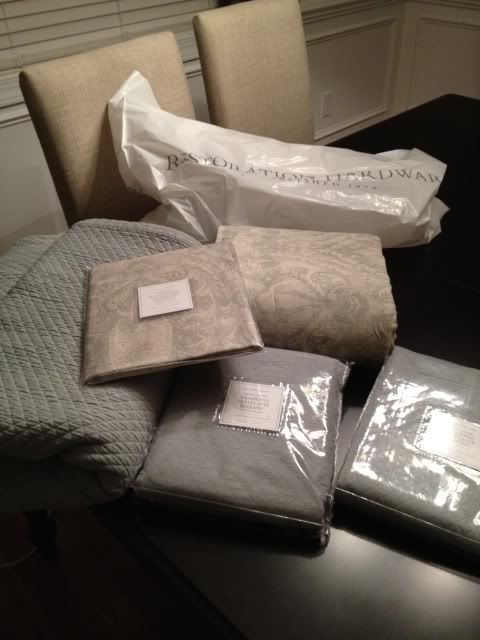
Everything was 60% off original prices and we ended up walking out with a new king bedding set.

Photobucket

Now, you might be thinking "but you don't have a king bed!" And you would be right. But allow me to explain.

When we did our bedroom makeover two years ago, we decided to stick with the furniture we already had. Namely, the queen bed and mattress I had bought for my first "grown up" apartment. "We don't need a king bed!" we said. "We sleep fine in a queen bed, and it's more cozy!" we said. Plus, we didn't want to spend the money.

Fast forward two years. I'm not sure what has changed, but we just don't sleep as good in our bed any more. Elbows are knocking and every toss and turn wakes the other person up. And then there was that one time that Lee smacked me in the face in the middle of the night -- so hard that I cried -- because he said he was dreaming he was catching a baseball.

So we've been scheming on a king bed for a while now. But the main thing holding me back? I invested a lot of money in our queen bedding (also from Restoration Hardware) and couldn't stomach the thought of doing that again.

Cue the going out of business sale! Sucks for them, good for us.

We just couldn't pass up the opportunity to score a king duvet and shams at 60% off. WAY less than we'd paid for our queen bedding, and probably even less than what we'd pay for a lesser-quality, don't-love-it-as-much set from Bed Bath & Beyond or a department store. Plus, we got the coverlet as well, which I'd always wanted for our current bed but couldn't justify the price. At 60% off, I could!

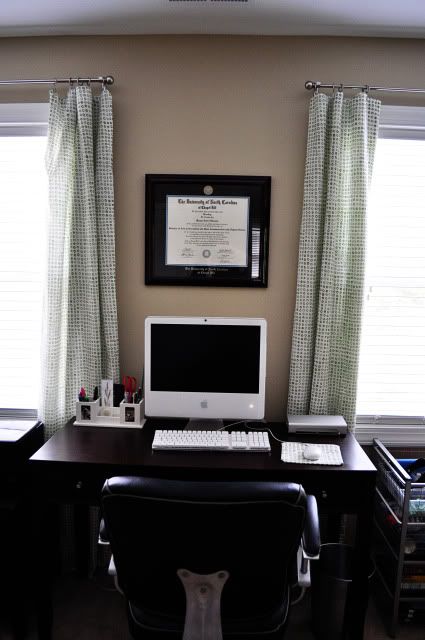
The bedding is not the exact same as what we have now, but it's similar. I'm good with that because a.) I love our current bedding (it's good quality and I love how it looks in our room) and b.) I'm just looking to upgrade the bed, not have to redecorate the room (the current paint and curtains will work nicely, as well as the bathroom).

Our plan is to tuck our finds away for now and slowly build up all the other items we still need (king sheets, comforter to go in the duvet, king pillows, etc.). And eventually pull the trigger on a mattress set and bed.

The one thing that's always bothered me about our bedroom is that the furniture is so matchy-matchy. So I definitely want to take this opportunity to go a different route with the bed. I've fallen in love with this headboard from Pottery Barn:

Photobucket

Photobucket

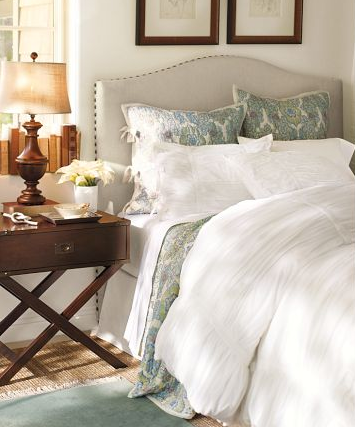
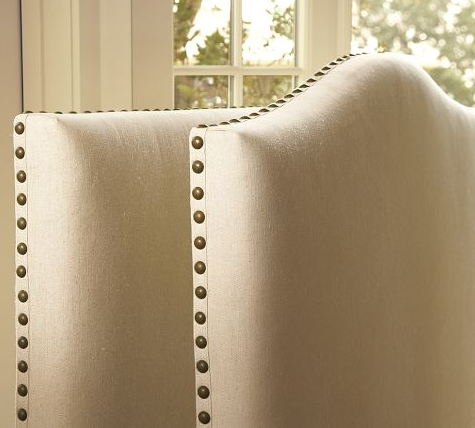
It's even named the Raleigh and is made in NC! But with a mattress purchase coming up, I doubt I can justify the price. There are lots of upholstered headboard DIYs floating around out there, so we might try our hand at that.

I'll be sure to keep you updated as things progress!

Wednesday, August 17, 2011

Office Wrap-Up

I'm officially ready to declare my office done. And I'm in L-O-V-E. Couldn't be happier with how everything turned out (well, taking my budget and resources into account).

As a refresher, here are some "before" shots:

Photobucket

Photobucket

And here's how she turned out:

Photobucket

Photobucket

Photobucket

You can visit previous posts to find out more about what I wanted out of this space, how I brought the old farm table back to life, my leaning bookcase storage, my DIY pinboard frames and how I turned Ikea duvets into curtains.

And now for some more details of what's going on up in here.

A big piece of the puzzle in this room was storage. Storage for office supplies, party supplies, wrapping supplies and crafting/scrapbooking supplies. And for all of that, I turned to Ikea.

Up first, a traditional Expedit bookcase.

Photobucket

The baskets house miscellaneous scrapbooking, stamping and party supplies and the open shelves hold finished scrapbooks, camera gear and my market totes.

This is also the site of my "wrapping station" with a basket for rolls of paper, a ribbon box and a vintage metal locker basket for tissue paper and gift tags.

Photobucket

Photobucket

Photobucket

Up next is another bookcase, this one housing actual books.

Photobucket

(I didn't say they were intellectual books.)

Photobucket

Lee bought me this bookcase for my birthday one year and stained it himself.

A fan is a must because it gets hot up here in the summer (we don't use the upstairs much so we intentionally set the thermostat high), and I love this little brushed nickel Hunter number from Target.

Beside the fan is my little stationery area, filled with a variety of cards and my address and bookplate stampers.

Photobucket

Photobucket

Beside my desk is another Ikea storage unit for all of my office-type supplies. It's not the prettiest thing ever but it serves its purpose.

Photobucket

Comparmentalized inserts for the top drawer are perfect for little doo-dads.

Photobucket

On my worktable, a 3-drawer box holds even more supplies and an empty paint can corrals various writing utensils.

Photobucket

And finally, a peek into the closet. This loft has a nice walk-in closet, but since clothes and shoes weren't what I was storing, I needed to add some vertical shelving. Ikea fit the bill yet again.

Photobucket

From top to bottom: tubs, trays and tablecloths for entertaining; acrylic trays of ribbon and crafting embellishments; more party trays/buckets and tins for fabric and hardware; and two shelves of candles, vases and frames.

Photobucket

Photobucket

Photobucket

Photobucket

I store extra gift bags on a hanger in the closet as well.

Photobucket

And here's a better peek into the acrylic trays, just because they're pretty (if you haven't seen a pattern forming yet, I kind of have a thing for ribbon).

Photobucket

Photobucket

Photobucket

Finally, I added some additional seating (chair and throw are from Ikea) and a new light fixture (barn light from Lowe's).

Photobucket

I'm super happy with how it turned out and ready to get up there and be inspired!

Wednesday, July 13, 2011

Office Project Numero Quatro: Pinboard Frames

Read about my office here, and parts 1, 2 and 3 of the makeover here, here and here.

Next on my list for the office was something to go on the wall above my worktable. I knew I wanted some sort of pinboard solution so I could tack up mementos, pictures and inspirations like craft and decor ideas, paint chips, fabric swatches, etc. So I hopped on the picture-frame-turned-pinboard bandwagon.

I started by scouting the Raleigh flea market for large frames that I could spray paint. I think I probably paid around $20 for all four.

Photobucket

Photobucket
(Isn't the black and gold one nice?!)

After spray painting them white, I cut pieces of foam core to fit each frame and then covered the foam core with a thin layer of bulletin board material (using spray mount to adhere the bulletin board to the foam core).

Photobucket

I thought they looked pretty good at this point, but went one step further and covered the foam core/bulletin board with linen fabric (using good ol' hot glue).

Photobucket

Photobucket

And now for the finished product:

Photobucket

After playing around with the layout several times, I finally decided on two frames hung horizontally and two hung vertically.

And those light fixtures on either side? They're actually outdoor lights from Lowe's. (I can't find them on the site anymore but the stores may still have them.) I think they were around $20 each. And I L-O-V-E them.

Another secret? They're not hooked up to anything. They don't work. (Since they're meant to be outdoor lights they have to be hard-wired; they don't have a convenient little cord that you plug into an outlet). If I had begged hard enough I probably could have gotten Lee to work some magic and make it happen. But when we considered that we'd have to run wiring through the wall and cut out holes behind the lights and install another light switch (that probably wouldn't make any sense to future owners), I decided I was perfectly ok with them just being pretty and not functional.

Photobucket

I haven't done much yet in the way of pinning things up, but so far I've got some mementos from our Australia trip on the left, some random pics on the bottom, our "places we've traveled" maps on the right and a pretty quote from Pinterest on the top.

The maps are something I've been wanting to do for a while. I'm using yellow pins for places I've been, blue pins for places Lee has been, and green pins for places we've been together (get it? yellow and blue make green? awwww). Now we just need to get some more pins up there! Methinks the northwest is looking very neglected...

Photobucket

And now for some more pretty pictures.

Photobucket

Photobucket

Photobucket

Photobucket

Photobucket

Photobucket

Completing the worktable area are my two stools. I originally wanted the real-deal Tolix barstools, but at $200 a pop it was not happening. Overstock saved the day with this lookalike set of two for under $100. I actually bought the stools as soon as I finished the table, and they were part of the reason I fell in love with the industrial light fixtures and knew they'd be perfect.

So what do you think? I have a few last details I still want to finish up and then I'll give you a final wrap-up of the room.

Wednesday, June 29, 2011

Office Project Numero Tres: Curtains

Read about my office here, and parts 1 and 2 of the makeover here and here.

I always underestimate the impact curtains can have on a room. Then once I finally get them hung I think "why didn't I do this months ago?" The answer to this is probably that curtains aren't easy and they aren't cheap.

Except for my office curtains. Here is their story.

I knew I wanted the curtains in this room to be bright and fun with some sort of graphic pattern. The likes of Bed Bath & Beyond / Target / Pier 1 were just not cutting it in this department.

So I started researching fabric. But I knew I would need about 10 yards of fabric for four panels, and even with fabric that was $10-15 per yard (never mind the fancy designer fabrics I was drawn to), it was still more than I wanted to spend.

Enter my friend Ikea.

On one of my sacred trips there (the closest Ikea to us is over two hours away), I browsed the fabric section but wasn't able to find anything I liked. The bedding department though? Just the ticket. I found a twin duvet cover in a fabric that I liked (with a small circle pattern in the olive-y/lime green I was looking for).

Photobucket

The length of the duvet was exactly the length I needed, and I figured out that I could cut the width of the duvet in half to create two panels, so I'd only need one duvet for each window. The best part? The $9.99 price tag. So for under 20 bucks, I was on my way to four glorious curtain panels.

Except I got them home and they sat in a closet for four months. And THEN I was on my way.

I sliced each duvet in two and used no-sew iron-on hemming tape to make a nice seam on the one side of each panel that had been cut.

Some inexpensive brushed nickel curtain rods and ring clips from Target later, I was in business.

Photobucket

Photobucket

Photobucket

Photobucket

Photobucket

And as a bonus? Each twin duvet cover also came with a pillowcase, so I DIY'ed a custom mousepad to match the curtains (and I still have another pillowcase left over).

Photobucket

I just bought a cheap mousepad from Walmart and used spray adhesive and hot glue to cover it with the fabric.

So there's my cheap and easy curtain story. Tune in next week for some wall art action!


Related Posts Plugin for WordPress, Blogger...